Site Scan - Inspect Tool
keeping inspectors safe on the ground
The Site Scan tools enable the user to safely perform previously difficult tasks that required advanced knowledge of flying a UAV.
About Inspect Tool
The Inspect tool allows the user to easily and safely maneuver the copter with for closeup inspections of difficult to access areas like the top of a cell tower or the side of a highrise building. This is accomplished by introducing the user to intuitive paradigms they are familiar with like zoom in/out and dragging map to select destination, panning to look around, tap to center point of interest, to name a few.
My Role
Responsible for designing for flows, wireframes, concepts, prototypes and interaction specifications. Also collaborated closely with developers and flight engineers on implementation.
Why an inspection Tool

Climbing to inspecting large or tall structures can be a challenging and dangerous job, for example, an inspector has to climb up to 200ft to asses the damage of a faulty cell tower, once up there they have to move around the structure, specially if the damage is not on the side that they climbed. After that they have to climb for a second time and fix the problem. This takes time and put's the persons life in some danger with every climb.
Come Inspect tool. The inspector flies a drone copter to and around the cell tower, getting as close as safely possible with a few taps and swipes of their fingers taking as pictures from as many points of view as needed. Quick, safe and reliable.
The Challenge
We needed to create a tool that was not only easy to learn, that it did not present a series of frustrating pain points for the user, as this is a tool that will be used many times on a daily basis but most importantly was that it provided the adequate feedback to the user to safely maneuver the copter in space.
Selecting Altitude and destination
First Iteration
In the first iteration we allowed the user to select a destination by tapping on the screen, doing so would present a them a path that the copter would travel. Long pressing the destination would initiate the flight and at any point the user could pause to select new destination for the vehicle. Alongside the user had the ability to adjust the altitude for the copter, allowing them to fine tune the the visibility of the object to be inspected. Once they had the perfect framing the could return to full First-person view to perform their inspection and take the necessary pictures.
This approach would allow the user to quickly and safely guide the copter and get as close as possible to the point of interest to be inspected.

User can tap anywhere in the map to select a destination
User is indicated to long press on destination to travel
User has selected destination and a path is drawn

Vehicle begins travel, at any point the user can pause travel to select new destination point
Map overview with picture in picture of first-person view
User can toggle to first person view and still have a maintain visibility of the map view
Unfortunately during user testing we quickly realized that it was not very intuitive and that the user had trouble selecting the destination due to it being obstructed by their finger. Out of the 40 users interviewed, 80% reported this issue, 15% were indifferent and 5% really liked the Select Destination paradigm.
Final Implementation
Taking note from the user testing a new approach has taken to eliminate the negative key points that the users encountered.
Altitude bar more is more intuitive with a better readout of the copters behavior
Destination selector has a more familiar paradigm that gives the user visibility of the desired point of interest region
Added fine-tuning controls for better first-person view inspection adjustments
Adjusting altitude
The altitude bar was redesigned to give the user more control and better feedback loop of the copters behavior. The biggest differentiation was the current altitude indicator which not only told the user the current altitude but would update to visualy inform the user if the copter was ascending or descending.
Old altitude bar
New altitude bar
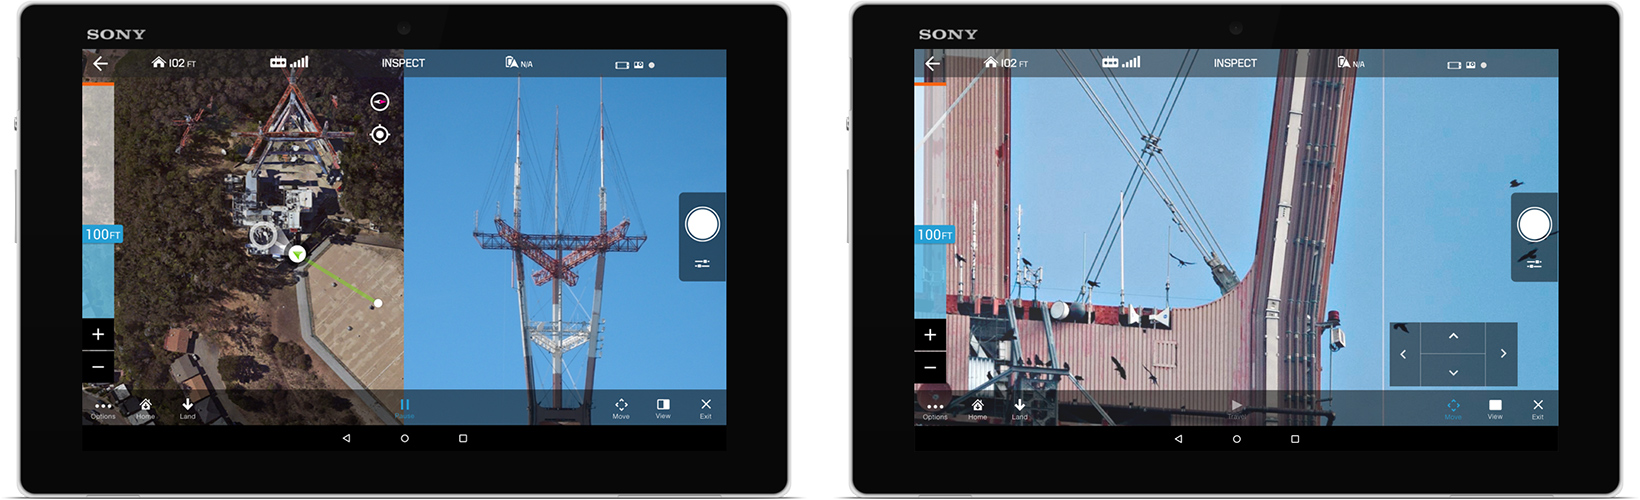
Destination Selector
The new destination selector works by allowing the user to drag the map instead of selecting a point to select the point of interest area that they want the copter to fly too. This same paradigm will allow the user to select a new destination mid flight if they desired too, an example would be to adjust the journey in case there was an obstacle, like a crane, on the way that they had not accounted for.
User is instructed to drag map to select destination
When user drags map a reticle appears in the center, allowing the user to see the destination are with more detail and a connecting line appears indicating the intended travel path
Once the user presses the Travel button, the copter will start it's trajectory. The use can change the destination by dragging the map and pressing the Travel button once more
Fine-tuning Controls and FPV
An important thing to note is that gagging the distance between 2 objects from far away is very difficult for even the most skilled pilots, let alone a novice user, and trying to inspect a structure can be challenging from the ground. This is where the fine-tuning controls help the user get as close as the need to the structure in a very safe manner.
This controls allows the user to move the copter slightly forward, back and to the sides to safely get as close as needed to the infrastructure in increments of 1ft. After extensive user testing it was determined that this number was the one that felt the safest for most users. If the user long presses the any of the directions, the vehicle will incrementally keep moving in the desired direction at a very slow speed to insure safety.
Fine-tuning inspection controls
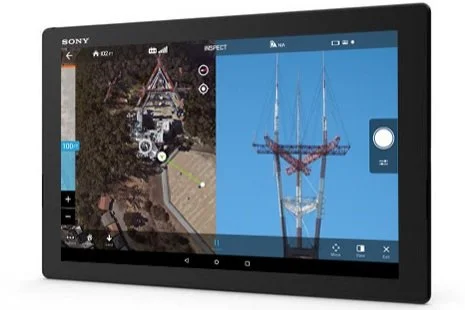
The ability to quickly change between the map and FPV views is very important to the user, specially, sometimes it's even more important to have both, when inspecting multiple structures or objects in a single flight.
Full FPV view: Gives user maximum visibility from the copters perspective
Split Screen view: Gives the user both navigation control and visibility from the copters perspective, default view
Map view: Gives user maximum navigation control from a top view.
This implemented changed greatly enhanced this feature, and found that 95% of the users were very happy with the changes and indicated that it felt safer to fly, also new users felt more confident while flying for the first time.